How to Make Raised Panel Doors: A DIY Guide
This guide provides a comprehensive step-by-step process on how to make raised panel doors. It is designed for DIY enthusiasts who want to enhance their woodworking skills. The guide covers everything from the necessary materials and tools, to the detailed procedures of constructing the door. It also includes tips and precautions to ensure the creation of a durable and aesthetically pleasing raised panel door.
Step-by-Step Process: How to Make Raised Panel Doors: A DIY Guide
Raised panel doors are a classic feature in traditional and contemporary homes, adding a touch of elegance and sophistication to any room. They are characterized by a center panel that is raised above the rest of the door, creating a three-dimensional effect. While these doors can be purchased from a variety of retailers, they can also be made at home with the right tools and a bit of patience. This DIY guide will walk you through the step-by-step process of making raised panel doors.
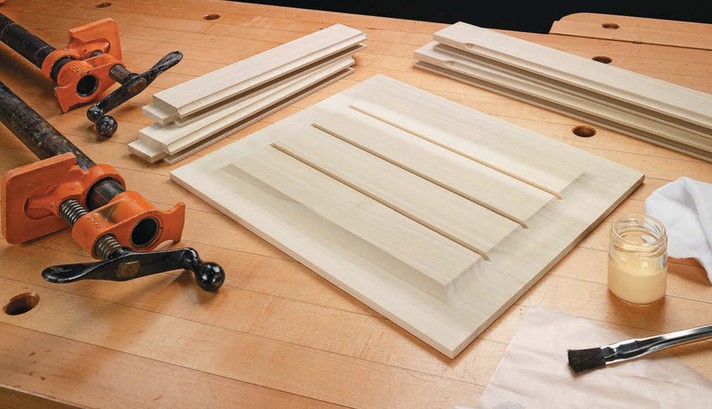
The first step in creating a raised panel door is to gather the necessary materials. You will need a table saw, a router with a raised panel bit, clamps, wood glue, and of course, your chosen wood. The type of wood you choose will depend on your personal preference and the style of your home, but popular choices include oak, cherry, and pine.
Once you have your materials, you can begin by cutting your stiles and rails. These are the vertical and horizontal pieces that frame the door. The length of your stiles should be the height of your door, while the length of your rails should be the width of your door minus the combined width of the two stiles. After cutting these pieces, you can use your router to cut a groove along the inside edge of each piece. This groove will hold the raised panel.
Next, you will need to cut your panel. The panel should be cut to fit snugly within the grooves of the stiles and rails, with a little room for expansion and contraction. Once the panel is cut, you can use your router and raised panel bit to create the raised effect. This is done by running the router around the edges of the panel, gradually increasing the depth of the cut until the desired height is reached.
After your pieces are cut and shaped, you can begin assembling your door. Apply wood glue to the grooves of the stiles and rails, and then fit the panel into place. Clamp the door together and allow the glue to dry. It’s important to note that the panel should not be glued into place. This allows the wood to expand and contract with changes in humidity, preventing the door from warping.
Once the glue is dry, you can remove the clamps and sand the door to smooth out any rough edges. If desired, you can also apply a finish to the door to enhance the natural beauty of the wood and protect it from damage.
Creating raised panel doors is a rewarding project that can add a touch of elegance to your home. While it does require some woodworking skills and patience, the end result is well worth the effort. With the right tools and this step-by-step guide, you can create beautiful, custom doors that reflect your personal style and enhance the aesthetic of your home. Whether you’re a seasoned DIY enthusiast or a beginner looking to take on a new project, making raised panel doors is a great way to challenge your skills and create something truly unique.In conclusion, making raised panel doors involves several steps including gathering materials, cutting the stiles and rails, creating the panel, assembling the door, and applying the finish. This DIY project requires precision and attention to detail, but with the right tools and patience, it is achievable. It allows for customization and personal touch, adding character to your home decor.
DIY Bathroom Makeover: Affordable Upgrades for a Fresh Look
DIY Bathroom Makeover: Affordable Upgrades for a Fresh Look is a comprehensive guide that provides practical and cost-effective solutions for transforming your bathroom. It offers a range of innovative ideas and step-by-step instructions to help you revamp your bathroom without breaking the bank. From simple changes like painting and updating fixtures to more complex projects like installing new tiles or a vanity, this guide covers it all. It’s designed to inspire and empower homeowners to create a bathroom that not only meets their functional needs but also reflects their personal style and aesthetic preferences.
10 Easy Steps to Achieve a DIY Bathroom Makeover: Affordable Upgrades for a Fresh Look
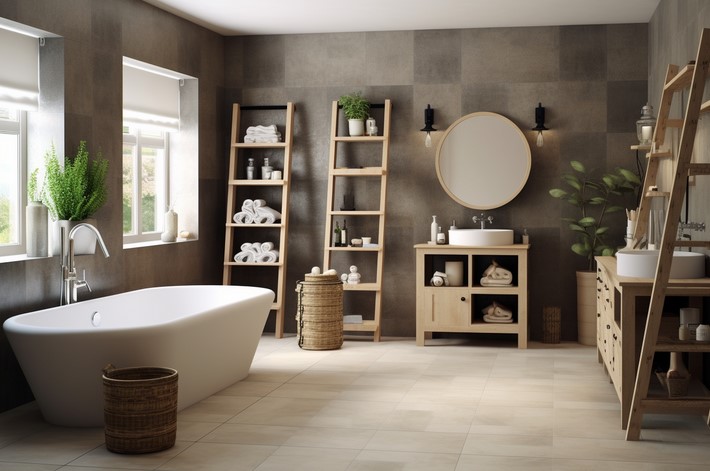
A DIY bathroom makeover can be an exciting project that not only enhances the aesthetic appeal of your home but also increases its value. With a little creativity, planning, and a modest budget, you can transform your bathroom into a stylish and functional space. Here are ten easy steps to achieve a DIY bathroom makeover with affordable upgrades for a fresh look.
Firstly, start with a plan. Identify what you want to change, what you want to keep, and the overall look you’re aiming for. This will help you stay focused and avoid unnecessary expenses. Consider factors such as the size of your bathroom, the amount of natural light it receives, and your personal style preferences.
Secondly, set a budget. This will guide your decisions and help you prioritize your upgrades. Remember, you don’t have to do everything at once. You can tackle one project at a time, spreading out the costs over a period of time.
Next, consider repainting your bathroom. A fresh coat of paint can dramatically change the look and feel of a room. Opt for light, neutral colors to make your bathroom appear larger and brighter. If you’re feeling adventurous, consider adding a feature wall with a bold color or pattern.
Fourthly, upgrade your fixtures. Replacing outdated faucets, showerheads, and light fixtures can make a big difference in the overall look of your bathroom. Look for modern, energy-efficient models that will not only improve the aesthetics but also save you money in the long run.
Fifthly, consider replacing your vanity. A new vanity can serve as a focal point in your bathroom, adding style and functionality. If a new vanity isn’t in your budget, consider painting or refinishing your existing one.
Next, think about your storage options. Adding shelves, baskets, or cabinets can help you organize your bathroom and keep it clutter-free. This not only improves the functionality of your bathroom but also enhances its visual appeal.
Seventhly, consider updating your flooring. While this can be a more expensive upgrade, it can significantly improve the look of your bathroom. Consider materials like ceramic tile or vinyl, which are both durable and water-resistant.
Next, pay attention to the details. Small touches like a new shower curtain, bath mat, or decorative accessories can make a big difference. Choose items that complement your color scheme and overall design theme.
Ninthly, don’t forget about lighting. Good lighting is essential in a bathroom. Consider adding a dimmer switch so you can adjust the lighting to your needs. Also, consider adding task lighting around the mirror for activities like applying makeup or shaving.
Finally, keep your bathroom clean and well-maintained. Regular cleaning and maintenance will keep your bathroom looking fresh and new. This includes cleaning the grout, sealing the tiles, and fixing any leaks or drips as soon as they occur.
In conclusion, a DIY bathroom makeover doesn’t have to be expensive or complicated. With a little planning, creativity, and elbow grease, you can transform your bathroom into a space that is stylish, functional, and uniquely yours. Remember, the goal is to create a space that you love and that meets your needs, so don’t be afraid to personalize it and make it your own.In conclusion, a DIY bathroom makeover with affordable upgrades is a practical and cost-effective way to achieve a fresh look. It allows homeowners to personalize their space according to their preferences and needs, while also increasing the value of their home. With careful planning, creativity, and a bit of effort, a bathroom can be transformed significantly without breaking the bank.
Automobile Accidents Are Almost As Old As Automobiles Themselves
Road traffic injuries represent about 25% of worldwide injury-related deaths (the leading cause) with an estimated 1.2 million deaths (2004) each year.Automobile accidents are almost as old as automobiles themselves. Early examples include Mary Ward, who became one of the first document automobile fatalities in 1869 in Parsonstown, Ireland, and Henry Bliss, one of the United State’s first pedestrian automobile casualties in 1899 in New York.A car accident or car crash is an incident in which an automobile collides with anything that causes damage to the automobile, including other automobiles, telephone poles, buildings or trees, or in which the driver loses control of the vehicle and damages it in some other way, such as driving into a ditch or rolling over. Sometimes a car accident may also refer to an automobile striking a human or animal. Car crashes — also called road traffic accidents (RTAs), traffic collisions, auto accidents, road accidents, personal injury collisions, motor vehicle accidents (MVAs), — kill an estimated 1.2 million people worldwide each year, and injure about forty times this number (WHO, 2004). In the UK the Department of Transport publish road deaths in each type of vehicle. These statistics are available as “Risk of injury measured by percentage of drivers injured in a two car injury accident.” These statistics show a ten to one ratio of in-vehicle accident deaths between the least safe and most safe models of car.The statistics show[citation needed] that for popular, lightly built cars, occupants have a 6-8% chance of death in a two-car accident. (e.g. BMW 3 series 6%, Subaru Impreza 8%, Honda Accord 6%). Traditional “safety cars” such as the Volvos halve that chance (Volvo 700 4% incidence of death, Volvo 900 3%).The Toyota Land Cruiser SUV has a 6% incidence of occupant death in actual crashes. However, in multiple-vehicle crashes SUVs are not much more lethal than passenger cars.Although, rollovers are much more common in older SUVs as compared to passenger cars because of their top weight. For this reason SUVs actually post a greater threat to rollover and cause a fatality rather than passenger cars. Newer SUVs such as the Jeep Grand Cherokee SRT8 have a lower center of gravity and enhanced stability control programs which lower the risk of rollover substantially.Overall the four best vehicles to be in are the Jaguar XJ series 1%, Mercedes-Benz S-Class / SEC 1%, Land Rover Defender 1% and Land Rover Discovery 1%.[citation needed]Motorcyclist deaths within England and Wales stand at 53% of the annual road death statistics. Scooters/mopeds up to 50cc only account for 3% of those deaths. 2% of the scooter deaths were 16-19 year olds who had not taken CBT (Compulsory Basic Training). (Statistics taken from 2004/2005 DSA annual road deaths percentages)Cars have many basic safety problems – for example, they have human drivers who make mistakes, wheels that lose traction when the braking or turning forces are too high. Some vehicles have a high center of gravity and therefore an increased tendency to roll over. When driven at high speeds, collisions can have serious or even fatal consequence.Early safety research focused on increasing the reliability of brakes and reducing the flammability of fuel systems. For example, modern engine compartments are open at the bottom so that fuel vapors, which are heavier than air, vent to the open air. Brakes are hydraulic and dual circuit so that failures are slow leaks, rather than abrupt cable breaks. Systematic research on crash safety started[citation needed] in 1958 at Ford Motor Company. Since then, most research has focused on absorbing external crash energy with crushable panels and reducing the motion of human bodies in the passenger compartment. This is reflected in most cars produced today.Airbags, a modern component of automobile safetySignificant reductions in death and injury have come from the addition of Safety belts and laws in many countries to require vehicle occupants to wear them. Airbags and specialised child restraint systems have improved on that. Structural changes such as side-impact protection bars in the doors and side panels of the car mitigate the effect of impacts to the side of the vehicle. Many cars now include radar or sonar detectors mounted to the rear of the car to warn the driver if he or she is about to reverse into an obstacle or a pedestrian. Some vehicle manufacturers are producing cars with devices that also measure the proximity to obstacles and other vehicles in front of the car and are using these to apply the brakes when a collision is inevitable. There have also been limited efforts to use heads up displays and thermal imaging technologies similar to those used in military aircraft to provide the driver with a better view of the road at night.There are standard tests for safety in new automobiles, like the EuroNCAP and the US NCAP tests. There are also tests run by organizations such as IIHS and backed by the insurance industry.Despite technological advances, there is still significant loss of life from car accidents: About 40,000 people die every year in the United States, with similar figures in European nations. This figure increases annually in step with rising population and increasing travel if no measures are taken, but the rate per capita and per mile traveled decreases steadily. The death toll is expected to nearly double worldwide by 2020. A much higher number of accidents result in injury or permanent disability. The highest accident figures are reported in China and India. The European Union has a rigid program to cut the death toll in half by 2010, and member states have started implementing measures.Automated control has been seriously proposed and successfully prototyped. Shoulder-belted passengers could tolerate a 32 g emergency stop (reducing the safe inter-vehicle gap 64-fold) if high-speed roads incorporated a steel rail for emergency braking. Both safety modifications of the roadway are thought to be too expensive by most funding authorities, although these modifications could dramatically increase the number of vehicles able to safely use a high-speed highway. This makes clear the often-ignored fact road design and traffic control also play a part in car wrecks; unclear traffic signs, inadequate signal light placing, and poor planning (curved bridge approaches which become icy in winter, for example), also contribute.